
How to Photograph The Milky Way
Posted by Leigh Diprose on 24th Jul 2018
How to Photograph The Milky Way
Photographing our closest disk-shaped galaxy has mesmerized many photographers and observers including Galileo Galilei, who was first to distinguish the individual cluster of stars that form what we now call the Milky Way.
From the Northern Hemisphere observers can view this nighttime spectacle from March to October; however, the accomplished astrophotographer knows that the optimal time to photograph the Milky Way is from April through to the end of July. With this timing in mind, there are some essential research steps, equipment and camera settings that will help convert your average nighttime snap into indeed something spectacular.
Find a Dark Location
Choosing the correct location to photograph is something many beginner photographers overlook. What you want to do is isolate yourself away from any unnatural light that may pollute the view of the stars in the night sky.
Travelling outside your city to less populated areas is usually the best place to be. If you are not sure where to go, depending on your location in the world there are plenty of useful sites to assist with selecting the primal destination. Darksite Finder is most definitely a handy page to bookmark as you will be able to search the map for the ideal spot visually.
Research Weather Conditions and Moon Phase
Next on the list, weather and moon phase are critical components to ensure the best Milky Way photos are achieved. The perfect weather conditions should consist of the following, a cloudless sky and a low dew count. You can compensate the latter by attaching a few instant glove warming satchels around your lens with a rubber band.
To predict what the cloud cover will be on any given night head over to Clear Dark Sky and check out the local forecast for your area.
Any sign of the moon will negate a terrible exposure of the night sky. Instead, opt for an evening where there is no moon present. Study the moon phase by using a helpful app that will no doubt become your favourite assistant.
The PhotoPills app is a must for every photographer’s smartphone home screen. Within the handy app not only will you be able to see the moon phase, but you can also check the location of the Milky Way using augmented reality. All you need to do is hold your phone up to the night sky, and a visual overlay of the moon and Milky Way will display, including their position and path. All you have to do then is align your composition to match the prediction.
Take the Essential Equipment
Along with your gloves and flashlight ( a red lens on the flashlight will be easier on your eyes), pack a sturdy tripod, and of course, a rock solid tripod head like the Acratech GP Ball-Head, a corded or wireless cable release, a wide angle lens around 14mm - 18mm (35mm equivalent), a mirrorless or DSLR camera and some spare batteries.
Use the Correct Camera Settings
Navigate to the ISO dial or menu on your camera and change the setting to ISO 3200. This sensitivity should be sufficient enough to allow enough light in without introducing too much digital noise. Talking about noise ensure noise reduction is turned on in the camera's menu.
Shooting in a RAW quality is non-negotiable with Milky Way photography. You will need all the image detail and pixel count for post-processing. Jpeg is not sufficient enough for this type of photography.
Once you have set your lens to the widest focal point and turned on manual focus, change the aperture to the minimum of F2.8. Letting in lots of light is critical for prolonged exposure of the night sky. Opening the lens up combined with a higher ISO will bring the best results.
If you are using a mirrorless camera turn on focus peaking when in manual focus. Focus peaking can make all the difference when focusing in low light situations thanks to a visual ‘peaking’ representation of subjects when they reach the highest point of focus. In the case of Milky Way photography, look for the peaking on your LCD screen in the brightest stars. Once you see this, you know you have the sharpest focus possible.
Next, change the camera’s shutter speed to around 30 seconds. If you have longer shutter speed, this can result in blurred stars as the earth will rotate causing motion blur in the stars. Shutter speeds will vary depending on the focal length of the lens. There are however many apps out there that can assist with the mathematical equation to work out the optimal exposure time. Try the Dark Skies app as an excellent place to start.
The Most Important Stage - The Edit
Once you have captured the Milky Way, don’t get too discouraged once you see the dull-like images on the back of the camera’s LCD screen. Editing is something you should not skip. Take the time to import the RAW images into Lightroom and increase the contrast, black and whites to make the stars pop. Add some clarity for good measure, and you will be well on your way to creating a masterpiece.
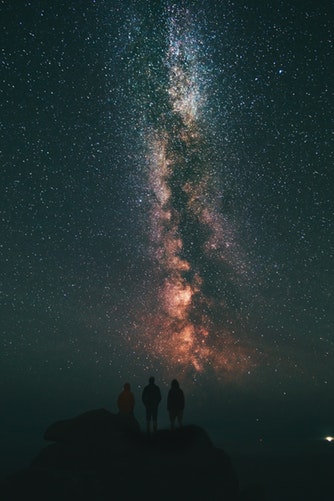
As a bonus tip when you are out shooting to include foreground subjects like trees or buildings as this helps with perspective.